



Installing a new firmware version on your PIXEM 2
Keep your PIXEM 2 system up to date to benefit from the latest improvements.
Before you start
Firmware is already installed on your PIXEM 2. To take advantage of the latest improvements, install any new firmware version available from the Move’N See support page.
We recommend upgrading all devices at the same time: the robot, the watch and the three beacons. Make sure that all devices are fully charged before starting the procedure.
1. Download the latest firmware version
Download the latest firmware version from the Move’N See support page.
Save the firmware file on a micro-SD card formatted in FAT32, FAT16 or FAT12 format. Usually, micro-SD cards with a capacity lower than 32 GB are already formatted with a compatible format.
The file must be saved in the root directory of the memory card, not inside a sub-directory.
This file is meant to be opened directly by PIXEM 2. Do not try to open it from your computer.
Check that the file name is exactly update.mnp, without any extra “(1)” or “(2)” at the end of the name.
(Warning: On Windows, the file extension can be hidden. In this case, do not modify it or add it manually.)
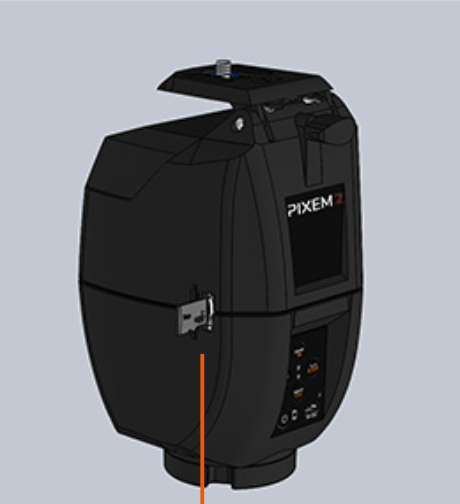
Insert the micro-SD card into the robot slot, located on the side of the robot.
2. Start the upgrade mode
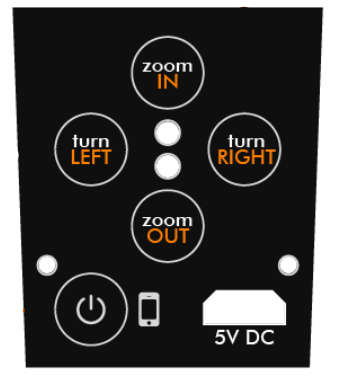
Release the Turn Right button when the red light starts blinking.
- Press and hold the Turn Right button.
- Briefly press the power button.
- Release the Turn Right button when the red light starts blinking.
3. Upgrade each device
You must upgrade each device one after another. Do not upgrade all devices at the same time.
Upgrade the robot
Press briefly the Turn Left button. The green LED blinks quickly during the upgrade and stops when the upgrade is completed.
Upgrade a watch or a beacon
Before starting the procedure, make sure that the watch or beacon is switched off.
- Start the upgrade mode: press the start button for several seconds until the green LED starts blinking.
- Release the button, then press it again briefly to launch the upgrade.
- The green LED blinks quickly during the upgrade and turns solid green when the upgrade is completed.
Is there a problem?
Do not panic. If the upgrade is interrupted because of an error or because the device switched off, you can restart the procedure from the beginning.
If the red LED does not blink during step 2:
- Make sure your microSD card is formatted as FAT32, FAT16, or FAT12. While cards of 32GB or less are usually set up this way by default, larger cards can also be used if you format them to FAT first (sometimes called MS-DOS format).
- Check that the update file is stored at the root of the micro-SD card and not inside a sub-directory.
- Check that the micro-SD card is correctly inserted into the robot slot.